How to Add and Delete Users in Ubuntu 24.04? (User Management in Ubuntu)
Managing users is a fundamental skill for any Linux system administrator. When you first set up a Linux server, especially on Ubuntu, you typically have access only through the root account.
Although the root user gives you full control over the system, using it for everyday tasks can be risky and potentially harmful. A better practice is to create a separate, non-root user for daily administration. This helps limit the chances of accidental system-wide changes and enhances security. If you’re managing a multi-user environment, each person should have an account to ensure accountability and separation of permissions.
For actions that require administrative rights, Ubuntu includes a tool called sudo. This command allows you to execute tasks with elevated privileges without logging in as the root user. In this guide, you'll see how to create a new user on Ubuntu, grant them sudo access, and safely remove users when they're no longer needed.
Prerequisites
To follow along with this user management tutorial:
- You’ll need access to a server running Ubuntu 24.04.
- Make sure you have root access to your server and that a firewall is properly configured.
User Management in Ubuntu 24.04
Add User in Ubuntu
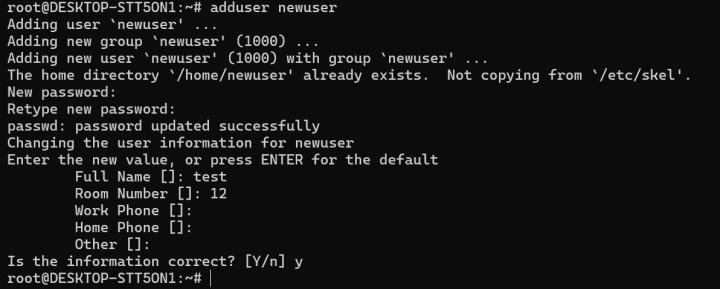
To create user in Ubuntu system, you can use the adduser command. If you're logged in as the root user, run:
$ adduser newuser
Ubuntu Create User
If you're using a regular account with sudo access, use:
$ sudo adduser newuserAfter running the command, you'll be guided through a few setup steps:
- Set and confirm a password for the new user.
- Optionally provide additional details like full name, phone number, etc. You can skip any of these by pressing Enter.
- Confirm that the information entered is correct by typing Y.
Once complete, the new account will be ready to use, and the user can log in with the password you just set.
If you want this user to perform administrative tasks, continue to the next section to give them sudo access.
Granting Sudo Access to a User on Ubuntu
If you want a user to perform administrative tasks, you need to give them sudo privileges. This allows the user to run commands as the root user when needed.
There are two common methods to do this:
Method 1: Add the User to the sudo Group
On Ubuntu systems like 20.04 and 24.04, any user added to the sudo group automatically gains administrative access.
Check Current Groups for a User
To see which groups a user belongs to, run:
$ groups newuser
By default, the user will only be part of their group (named the same as their username).
Add User to sudo Group
To grant sudo access, add the user to the sudo group using:
$ sudo usermod -aG sudo newuser- -aG means "append the user to the group(s) specified".
- You must run this as a user who already has sudo rights or as root.
Method 2: Grant Specific Sudo Permissions via /etc/sudoers
Instead of using groups, you can assign sudo permissions directly by editing the sudo configuration file.
Open the Sudoers File Safely
Always use the visudo command, which prevents syntax errors and ensures the file is locked during editing.
As root:
# visudoAs a sudo-enabled user:
$ sudo visudoUbuntu usually opens this file in the nano editor by default, which is beginner-friendly.
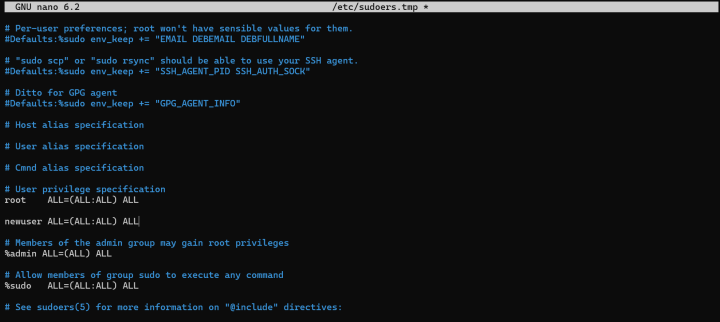
Add the User’s Sudo Entry
Look for this line:
root ALL=(ALL:ALL) ALLJust below it, add:
newuser ALL=(ALL:ALL) ALL
Replace newuser with your actual username. This line gives the user full sudo rights, similar to the root account.
Press Y to save changes and exit from the current window using Ctrl + X.
Your user now has administrative privileges. You can verify it by switching to the user and trying a sudo command like:
$ sudo apt updateLet me know if you want to assign limited sudo rights (only for specific commands).
Verifying Sudo Access for the New User
Once you've granted sudo privileges, you can test that everything works correctly.
While logged in as the new user, you can run regular commands normally like this:
regular_commandTo run the same command with administrative rights, just add sudo at the beginning:
$ sudo regular_commandYou'll be asked to enter the password for the current user account (not the root password). This confirms the user's identity before allowing elevated access.
Removing a User on Ubuntu
If a user account is no longer needed, it’s a good idea to remove it to keep your system clean and secure.
Delete a User (Keep Files)
To remove a user account but keep their files (like their home directory), run this as root:
# deluser newuser
If you’re using a regular account with sudo privileges:
$ sudo deluser newuserDelete a User and Their Home Directory
If you want to remove the user along with their home directory and personal files:
$ sudo deluser --remove-home newuserThis ensures that no leftover files are stored on the system.
Clean Up Sudo Permissions
If the deleted user had been granted sudo access manually, you should also remove their entry from the sudoers file.
Open the file safely using:
$ sudo visudoLook for a line like this:
newuser ALL=(ALL:ALL) ALLDelete that line to ensure future users with the same username don’t automatically receive elevated access.
Remove Unused Groups
If you created a group specifically for that user and no other users are part of it, you can remove the group:
$ sudo delgroup groupnameThis helps keep your group list tidy and reduces clutter in system permissions.
Temporarily Disabling a User Account on Ubuntu
In situations where you want to prevent a user from accessing the system without permanently removing their account or files, you can lock the account instead of deleting it. This is useful for temporary suspensions or inactive users.
Locking the User’s Password
One of the simplest ways to disable a user account is by locking their password. This prevents the user from logging in with their password, while keeping their files and settings intact.
As root, run:
# passwd -l usernameAs a sudo-enabled user, use:
$ sudo passwd -l usernameThe -l flag locks the password by adding a special character (like !) to the beginning of the encrypted password in /etc/shadow, rendering it unusable.
Unlocking the Password
To re-enable login for the user and restore their original password:
$ sudo passwd -u usernameThe -u option undoes the password lock and allows the user to log in again with their previous credentials.
Disabling User Login with a Non-Functional Shell
Another way to restrict access is to set the user's default shell to something that doesn’t allow interactive sessions.
Disable Shell Access
sudo usermod -s /usr/sbin/nologin usernameOr:
sudo usermod -s /bin/false usernameThis prevents the user from opening a shell or terminal session upon login.
Restore Original Shell
To allow shell access again (typically Bash):
$ sudo usermod -s /bin/bash usernameUser Profile Security
When a new user is added to a Linux system (like Ubuntu), their home directory is created at /home/username, using default settings copied from /etc/skel.
By default, these directories are readable by all users, which might expose sensitive files if multiple users share the server.
Checking and Restricting Access:
To see current permissions:
$ ls -ld /home/usernameIf you see something like:
drwxr-xr-xit means other users can access this directory. To restrict access:
$ sudo chmod 0750 /home/usernameNote: Avoid using chmod -R, as it changes permissions recursively and could unintentionally alter files inside.
Setting Secure Defaults for Future Users:
To ensure all new user home directories are created with limited access:
1. Open /etc/adduser.conf
2. Set:
DIR_MODE=0750This ensures better privacy by default. You can confirm permissions again using:
ls -ld /home/usernameNow, only the user and system administrators can access the directory.
Set Password Policies
Strong passwords are your first defence against brute-force and dictionary attacks, especially on servers with remote access.
Minimum Password Length:
Ubuntu uses the common password file to control password policies.
To enforce a minimum length (e.g., 8 characters), edit:
$ sudo nano /etc/pam.d/common-passwordModify the relevant line to include:
minlen=8Example:
password [success=1 default=ignore] pam_unix.so obscure sha512 minlen=8Note: These settings apply to standard users only. Admins using sudo to create users may bypass these checks.
By following these best practices, you can strengthen your Ubuntu server's user access control, reduce risk, and maintain better system hygiene.
Password Expiration Policy with chage
To enforce password expiration and change policies:
View current password settings:
$ sudo chage -l usernameThis shows when the password was last changed, expiration dates, and aging settings.
Interactively set password rules:
$ sudo chage usernameSet password manually (example):
$ sudo chage -E 01/31/2015 -m 5 -M 90 -I 30 -W 14 username-E: Account expiration date
-m: Minimum days before password change
-M: Maximum days the password is valid
-I: Inactive days after password expiry before lock
-W: Warning days before password expiry
You can verify changes:
$ sudo chage -l usernameConclusion
By now, you should have a solid understanding of how to manage user accounts on Ubuntu 24.04. You've learned how to create and delete users, assign or remove sudo privileges, manage user groups, and temporarily disable accounts by locking them.
Proper user management is essential for keeping your system secure, organized, and running smoothly. With these skills, you can ensure each user only has access to what they need, reducing the risk of accidental or unauthorized changes.
If you’d like to dive deeper into configuring sudo permissions, consider exploring detailed guides on editing the sudoers file safely and effectively.
Looking to upgrade beyond the limitations of a VPS? BlueServers offers powerful and fully customizable dedicated servers designed for businesses that demand top-tier performance and reliability. With a fully isolated environment, you’ll have complete control over your resources—no shared usage, no performance drops. Each server is tailored to your needs, with flexible options for CPU, RAM, storage, and operating system.
Enjoy unlimited bandwidth, perfect for handling heavy traffic and mission-critical workloads. Whether your business operates in North America, Europe, Asia, or beyond, BlueServers lets you deploy dedicated infrastructure from any country, ensuring low latency and high availability worldwide. Choose your plan today and take full command of your hosting environment.
Blog